Hello Contract
Welcome! NEAR accounts can store small apps known as smart contracts. In this quick tutorial, we will guide you in creating your first contract in the NEAR testnet!
Join us in creating a friendly contract that stores a greeting, and exposes functions to interact with it.
Prerequisites
Before starting, make sure to setup your development environment.
Working on Windows?
See our blog post getting started on NEAR using Windows for a step-by-step guide on how to setup WSL and your environment
- 🌐 JavaScript
- 🦀 Rust
# Install Node.js using nvm (more option in: https://nodejs.org/en/download)
curl -o- https://raw.githubusercontent.com/nvm-sh/nvm/v0.39.7/install.sh | bash
nvm install latest

# Install NEAR CLI to deploy and interact with the contract
npm i -g near-cli
# Install Rust: https://www.rust-lang.org/tools/install
curl --proto '=https' --tlsv1.2 -sSf https://sh.rustup.rs | sh

# Contracts will be compiled to wasm, so we need to add the wasm target
rustup target add wasm32-unknown-unknown

# Install NEAR CLI-RS to deploy and interact with the contract
curl --proto '=https' --tlsv1.2 -LsSf https://github.com/near/near-cli-rs/releases/latest/download/near-cli-rs-installer.sh | sh

# Install cargo near to help building the contract
curl --proto '=https' --tlsv1.2 -LsSf https://github.com/near/cargo-near/releases/latest/download/cargo-near-installer.sh | sh
There is no need to have a testnet account to follow this tutorial.
However, if you want to create one, you can do so through a wallet, and use it from the near-cli by invoking near login.
Creating the Contract
Create a smart contract by using one of the scaffolding tools and following their instructions:
- 🌐 JavaScript
- 🦀 Rust
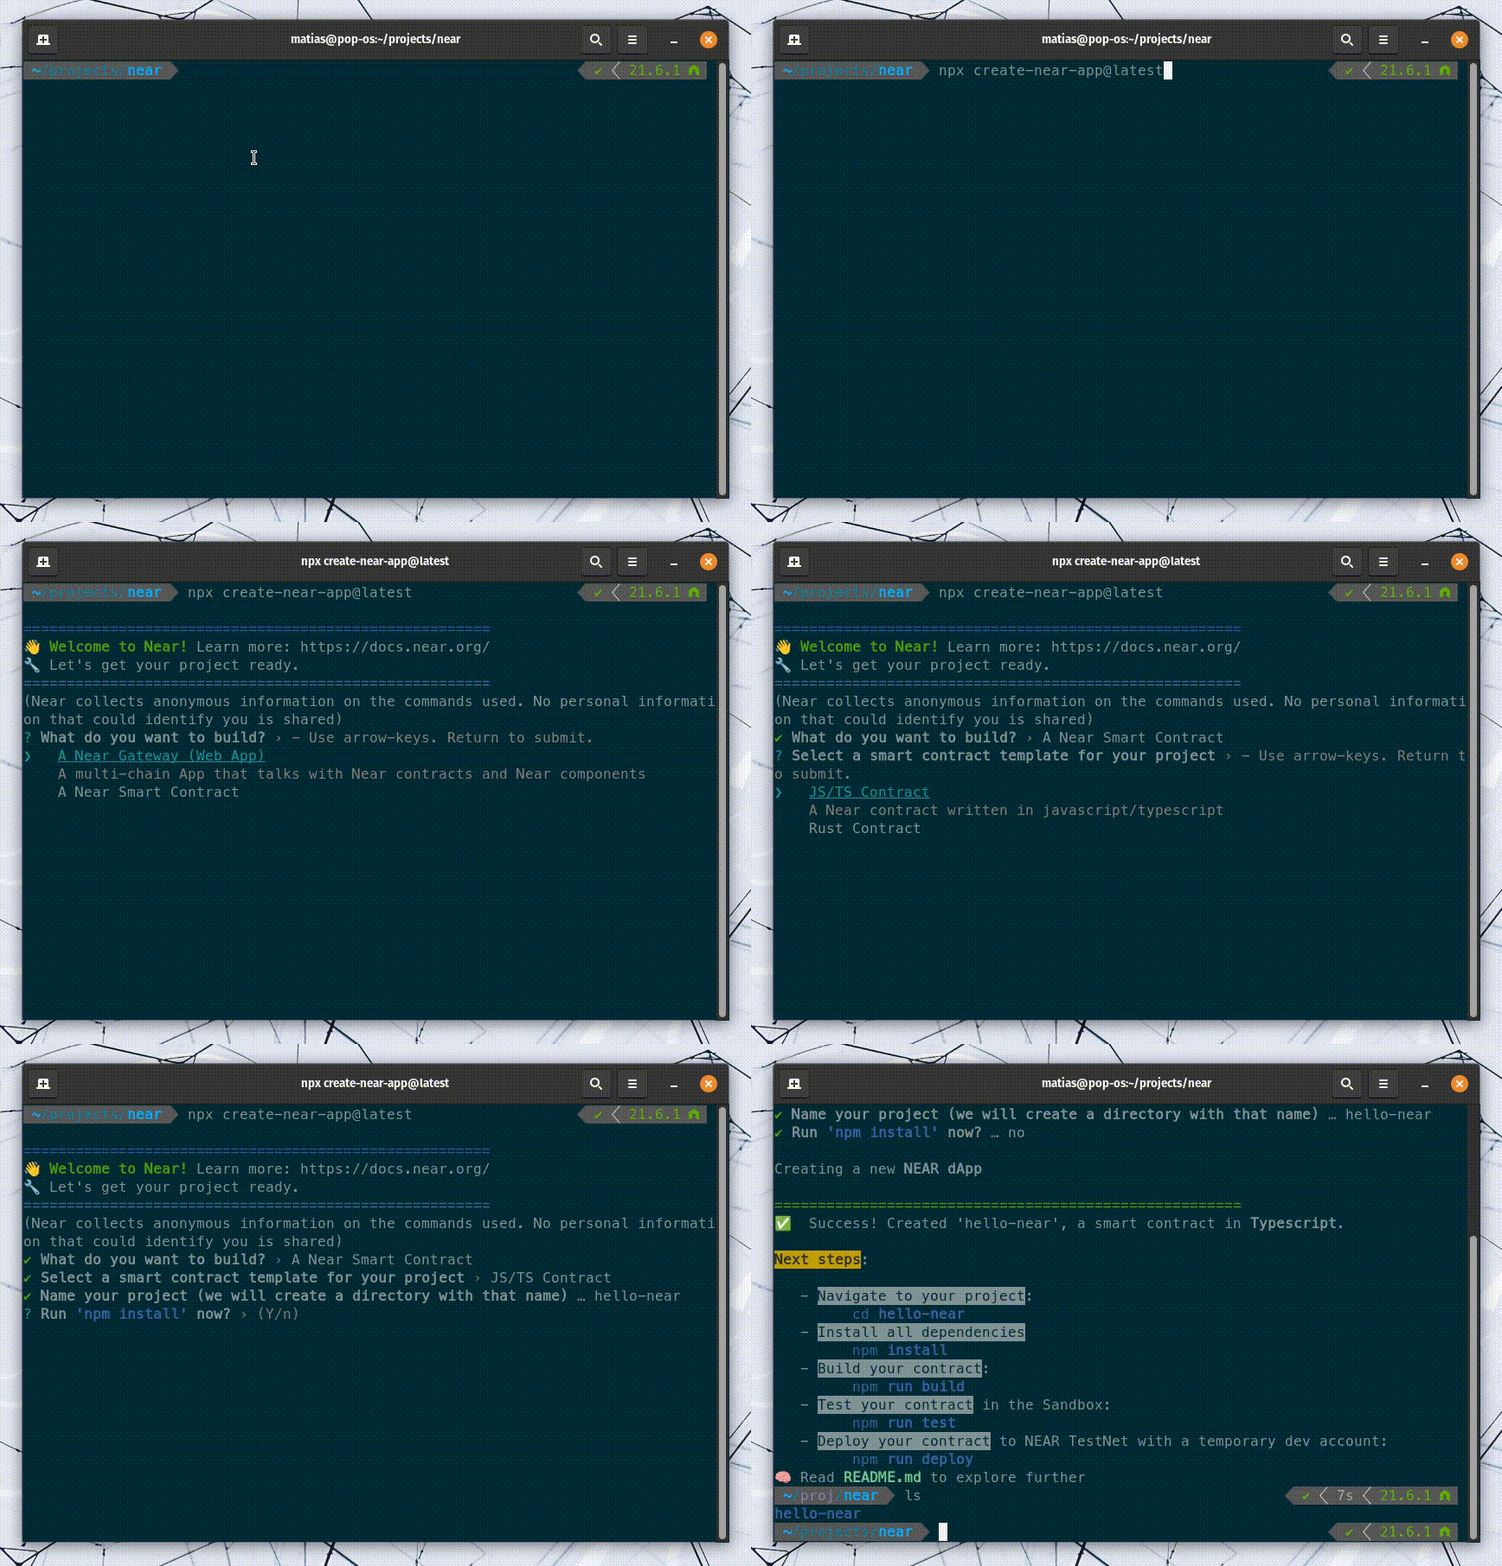
npx create-near-app@latest
 Creating a project using
 create-near-app
This will generate a project with the following structure:
├── sandbox-test    # sanbox testing
│   └── main.ava.js
├── src             # contract's code
│   └── contract.ts
├── README.md
├── package.json    # package manager
└── tsconfig.json
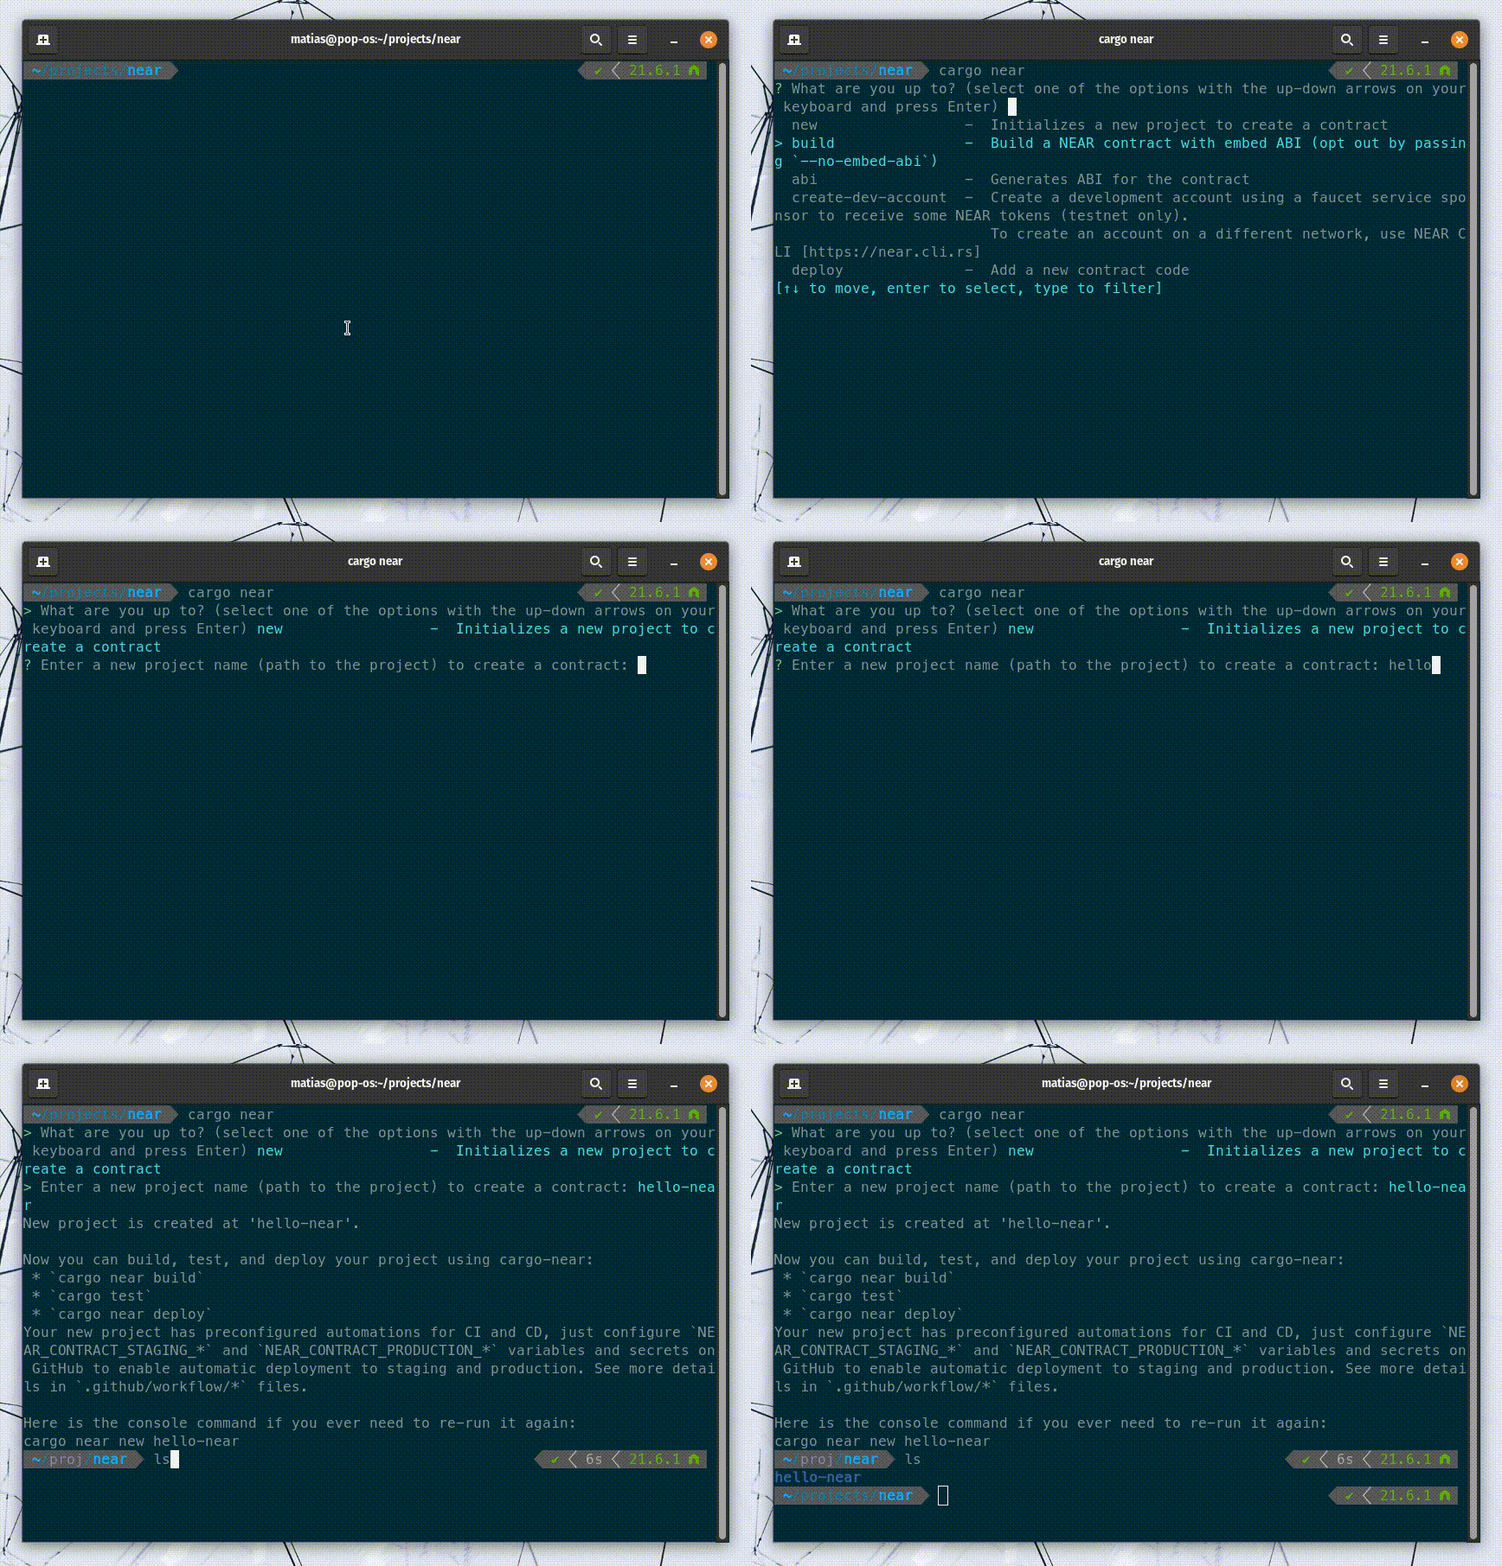
cargo near new <project_name>
 Creating a project using
 cargo near new
This will generate a project with the following structure:
├── src        # contract's code
│   └── lib.rs
├── test       # sandbox testing
│   └── test_basics.rs
├── Cargo.toml # package manager
├── README.md
└── rust-toolchain.toml
The Contract
The Hello World smart contract stores a greeting on its state, and exposes two functions to interact with it:
set_greeting: to change the greetingget_greeting: to fetch the greeting
- 🌐 JavaScript
- 🦀 Rust
<Github fname="index.js" language="js"
        url="https://github.com/near-examples/hello-near-examples/blob/main/contract-ts/src/contract.ts"
        start="4" end="18" />
<Github fname="lib.rs" language="rust"
        url="https://github.com/near-examples/hello-near-examples/blob/main/contract-rs/src/lib.rs"
        start="4" end="32" />
After finishing this tutorial, check our contract's anatomy page to learn more about the contract's structure
Build and Test
Building and testing the contract is as simple as running the test command. The contract will be compiled and the tests will be executed.
- 🌐 JavaScript
- 🦀 Rust
```bash
npm run test
````

<details>
<summary> Failing tests? </summary>

Make sure that you are using `node v18`, `v20` or `v22`. You can always use: `nvm use 18` to switch to `node v20`

</details>
cargo test
In the background, these commands are calling the build tools for each language and using a Sandbox to test the contract.
Testing the contracts within a Sandbox allows you to understand how the contract will behave once deployed to the network while having total control over the testing environment.
Create a Testnet Account
Now that you know the contract is passing the tests, let's create a testnet account in which to deploy the contract.
- 🌐 JavaScript
- 🦀 Rust
```bash
# Replace <your-account-id.testnet> with a custom name
near create-account <your-account-id.testnet> --useFaucet
```

<details>
<summary> Example Result </summary>

```bash
$> near create-account lovely-event.testnet --useFaucet
# New account "lovely-event.testnet" created successfully
```

</details>
```bash
# Replace <your-account-id.testnet> with a custom name
near account create-account sponsor-by-faucet-service <your-account-id.testnet> autogenerate-new-keypair save-to-keychain network-config testnet create
````

<details>
<summary> Example Result </summary>

```bash
$> near account create-account sponsor-by-faucet-service lovely-event.testnet autogenerate-new-keypair save-to-keychain network-config testnet create

# New account "lovely-event.testnet" created successfully
```

</details>
Remember that you can create a named account through any wallet (i.e. MyNearWallet) and then use it from the near-cli by invoking near login.
Deploy the Contract
Having our account created, we can now build and deploy the contract:
- 🌐 JavaScript
- 🦀 Rust
npm run build

near deploy <created-account> build/release/hello.wasm
Congrats! your contract now lives in the NEAR testnet network.
cargo near build

near contract deploy <created-account> use-file ./target/wasm32-unknown-unknown/release/<project-name>.wasm without-init-call network-config testnet sign-with-keychain send
Congrats! your contract now lives in the NEAR testnet network.
You can also build the contract with cargo build --release. This will compile the contract, but without metadata or the Contract Application Binary Interface (ABI)
Interacting with the Contract
To interact with your deployed smart contract, you can call its functions through the command line.
Get Greeting
The get_greeting function only reads from the contract's state, and can thus be called for free.
- 🌐 JavaScript
- 🦀 Rust
```bash
> near view <created-account> get_greeting
# "Hello"
```
```bash
> near contract call-function as-read-only <created-account> get_greeting json-args {} network-config testnet now
# "Hello"
```
Set Greeting
The set_greeting method writes on the contract's storage, and thus requires a user to sign a transaction in order to be executed.
- 🌐 JavaScript
- 🦀 Rust
> near call <created-account> set_greeting '{"greeting": "Hola"}' --accountId <created-account>
# Log: Saving greeting "Hola"
```bash
> near contract call-function as-transaction <created-account> set_greeting json-args '{"greeting": "Hola"}' prepaid-gas '100.0 Tgas' attached-deposit '0 NEAR' sign-as <created-account> network-config testnet sign-with-keychain send
#Log: Saving greeting "Hola"
```
Notice that we are signing the transaction using <created-account>, so in this case, we are asking the contract's account to call its own function
Moving Forward
That's it for the quickstart tutorial. You have now seen a fully functional contract with a minimal user interface and testing.
To better understand the contract's structure, check our contract's anatomy page.
If you prefer to see more examples, check our examples page.
Do not hesitate to reach out on Discord with any questions you have. We regularly host Office Hours, in which you can join our voice channel and ask questions.
Happy coding! 🚀
At the time of this writing, this example works with the following versions:
- near-cli:
4.0.13 - node:
18.19.1 - rustc:
1.77.0 - near-cli-rs:
0.8.1 - cargo-near:
0.6.1

