순환 공급(Circulating Supply) 생성
이전 튜토리얼에서는 대체 가능한 토큰(FT)이 무엇이며, 스마트 컨트랙트에서 토큰을 정의하는 방법을 살펴보았습니다. 이 튜토리얼에서는 컨트랙트 소유자에게 속한 순환 공급을 생성하고, NEAR 지갑에서 메타데이터와 함께 모든 토큰을 보는 방법에 대해 배웁니다.
시작하려면 이전 튜토리얼에서 작성한 코드를 사용하거나, 레퍼지토리의 2.define-a-token 폴더로 이동하세요. 레퍼지토리를 복제하지 않은 경우 컨트랙트 아키텍처를 참조하여 시작하세요.
이 튜토리얼의 완성된 코드를 보려면 3.initial-supply 폴더에서 찾을 수 있습니다.
소개
NEAR의 모든 대체 가능한 토큰 컨트랙트에는 순환 공급(Circulating Supply)으로 알려진 것이 있습니다. 이것은 컨트랙트에 존재하고 트랜잭션에 사용 가능한 토큰의 수입니다.
컨트랙트를 작성할 때 이를 구현할 수 있는 다양한 방법이 있습니다. 몇 가지 예는 다음과 같습니다.
- 시작 총 공급량을 지정하고 일련의 매개변수에 따라 분배합니다(Benji는 20%, Josh는 2.5%, 나머지는 Mike에게 할당).
- 모든 사람이 최대 X 개의 토큰을 청구할 수 있는 선착순 서비스 풀을 만드세요.
- 주문형 토큰을 생성하여 지정된 상한선까지 순환 공급이 꾸준히 증가하도록 합니다.
그러나 가장 간단한 방법은 컨트랙트를 초기화할 때 총 공급량을 지정하는 것입니다. 그런 다음, 전체 순환 공급이 생성되어 컨트랙트 소유자에게 전송됩니다. 그러면 소유자는 원하는 대로 토큰을 양도하거나 판매할 수 있습니다. 초기 공급이 생성되면 더 이상 FT를 발행할 수 없습니다. 이것은 순환 공급이 항상 총 공급과 동일하다는 것을 의미합니다.
컨트랙트 수정
이 로직을 구현하려면 스마트 컨트랙트에서 두 가지 사항을 추적해야 합니다.
- 소유한 토큰 수와 계정의 매핑
- 토큰의 총 공급량
매핑은 컨트랙트 내에서 언제든지 주어진 계정이 소유한 �토큰을 쉽게 확인하거나 수정할 수 있도록 합니다. 또한 표준에 따라 컨트랙트에서 토큰 공급을 쿼리하는 기능이 필요하므로, 총 공급량을 추적해야 합니다.
공급 설정
Head over to the src/lib.rs file and add the following code to the Contract struct.
Loading...
You'll now want to add the functionality for depositing the tokens into the owner's account. Do this by creating a helper function that takes an amount and an account ID and performs the deposit logic for you. First create a new file src/internal.rs such that your file structure now looks as follows.
src
  ├── ft_core.rs
  ├── internal.rs
  ├── lib.rs
  ├── metadata.rs
  └── storage.rs
In the internal.rs file, add the following code to create a function called internal_deposit which takes an AccountId and a NearToken as a balance and adds the amount to the account's current supply of FTs.
Loading...
Now that the functionality for depositing FTs is in place, switch back to the src/lib.rs file and add the internal module:
Loading...
In addition, add the following code to the new initialization function.
#[init]
pub fn new(
    owner_id: AccountId,
    total_supply: U128,
    metadata: FungibleTokenMetadata,
) -> Self {
    let casted_total_supply = NearToken::from_yoctonear(total_supply.0);
    // Create a variable of type Self with all the fields initialized.
    let mut this = Self {
        // Set the total supply
        total_supply: casted_total_supply,
        // Storage keys are simply the prefixes used for the collections. This helps avoid data collision
        accounts: LookupMap::new(StorageKey::Accounts),
        metadata: LazyOption::new(
            StorageKey::Metadata,
            Some(&metadata),
        ),
    };

    // Set the owner's balance to the total supply.
    this.internal_deposit(&owner_id, casted_total_supply);

    // Return the Contract object
    this
}
This will initialize the total supply to what you passed in and will call the internal_deposit function to add the total supply to the owner's account.
공급량 가져오기
Now that you've created a way to set the total supply, you'll also want a way to query for it as well as the balance for a specific user. The standard dictates that you should have two methods on your smart contract for doing these operations:
ft_total_supplyft_balance_of
Head on over to the src/ft_core.rs file and add the following code to these functions.
Loading...
At this point, you have everything you need to create an initial supply of tokens and query for the balance of a given account. There is, however, a problem that we need to solve. How will the wallet know that the total supply was created and is owned by the contract owner? How would it even know that our contract is a fungible token contract? If you were to deploy the contract and run through the setup process, you would be able to query for the information from the contract but you wouldn't see any FTs in the owner's NEAR wallet.
이벤트
Have you ever wondered how the wallet knows which FTs you own and how it can display them in the balances tab? Originally, an indexer used to listen for any function calls starting with ft_ on your account. These contracts were then flagged on your account as likely FT contracts.
When you navigated to your balances tab, the wallet would then query all those contracts for the number of FTs you owned using the ft_balance_of function you just wrote.
문제점
This method of flagging contracts was not reliable as each FT-driven application might have its own way of minting or transferring FTs. In addition, it's common for apps to transfer or mint many tokens at a time using batch functions.
해결책
A standard was introduced so that smart contracts could emit an event anytime FTs were transferred, minted, or burnt. This event was in the form of a log. No matter how a contract implemented the functionality, an indexer could now listen for those standardized logs.
As per the standard, you need to implement a logging functionality that gets fired when FTs are transferred or minted. In this case, the contract doesn't support burning so you don't need to worry about that for now.
It's important to note the standard dictates that the log should begin with "EVENT_JSON:". The structure of your log should, however, always contain the 3 following things:
- standard: the current name of the standard (e.g.
nep141) - version: the version of the standard you're using (e.g.
1.0.0) - event: 내보내는 이벤트 목록
The event interface differs based on whether you're recording transfers or mints. The interface for both events is outlined below.
Transfer events:
- old_owner_id: FT의 이전 소유자
- new_owner_id: FT를 전송받은 새 소유자
- amount: 전송된 토큰의 수
- 선택 사항 - memo: 이벤트에 포함할 선택적 메시지
Minting events:
- owner_id: FT가 발행되는 소유자
- amount: 발행되는 FT의 양
- 선택 사항 - memo: 이벤트에 포함할 선택적 메시지
예시
In order to solidify your understanding of the standard, let's walk through two scenarios and see what the logs should look like.
시나리오 A - 간단한 발행
In this scenario, the Benji mints 50 FTs to himself and doesn't include a message. The log should look as follows.
EVENT_JSON:{
  "standard": "nep141",
  "version": "1.0.0",
  "event": "ft_mint",
  "data": [
    {"owner_id": "benji.testnet", "amount": "50"}
  ]
}
시나리오 B - 배치(Batch) 전송
In this scenario, Benji wants to perform a batch transfer. He will send FTs to Jada, Mike, Josh, and Maria. The log is as follows.
EVENT_JSON:{
    "standard": "nep141",
    "version": "1.0.0",
    "event": "ft_transfer",
    "data": [
        {"old_owner_id": "benji.near", "new_owner_id": "josh.near", "amount": "1", "memo": "go team"},
        {"old_owner_id": "benji.near", "new_owner_id": "mike.near", "amount": "9000"},
        {"old_owner_id": "benji.near", "new_owner_id": "jada.near", "amount": "500"},
        {"old_owner_id": "benji.near", "new_owner_id": "maria.near", "amount": "500"}
    ]
}
컨트랙트 수정
At this point, you should have a good understanding of what the end goal should be so let's get to work! Open the src directory and create a new file called events.rs. This is where your log structs will live.
이벤트 파일 생성
Copy the following into your file. This will outline the structs for your EventLog, FtMintLog, and FtTransferLog. In addition, we've added a way for EVENT_JSON: to be prefixed whenever you log the EventLog.
Loading...
모듈 및 상수 추가
Now that you've created a new file, you need to add the module to the lib.rs file.
Loading...
발행된 총 공급량 로깅
Now that all the tools are set in place, you can implement the actual logging functionality. Since the contract will only be minting tokens at the very start when it's initialized, it's trivial where you should place the log. Open the src/lib.rs file and navigate to the bottom of the new initialization function. This is where you'll construct the log for minting.
Loading...
With that finished, you've successfully implemented the backbone of the events standard and it's time to start testing.
컨트랙트 배포
Since the current contract you have is already initialized, let's create a sub-account and deploy to that instead.
하위 계정(sub-account) 생성
Run the following command to create a sub-account events of your main account with an initial balance of 3 NEAR which will be transferred from the original to your new account.
near account create-account fund-myself events.$FT_CONTRACT_ID '3 NEAR' autogenerate-new-keypair save-to-legacy-keychain sign-as $FT_CONTRACT_ID network-config testnet sign-with-legacy-keychain send
Next, you'll want to export an environment variable for ease of development:
export EVENTS_FT_CONTRACT_ID=events.$FT_CONTRACT_ID
Build the contract as you did in the previous tutorials:
cd 2.define-a-token
cargo near build
Deploying and Initialization
It's time to deploy the contract, initialize it and mint the total supply. 초기 공급량을 1000 gtNEAR로 만들어 봅시다. 소수점 이하 24자리가 존재하므로, 총 공급 필드에서 1000 뒤에 24개의 0을 입력해야 합니다.
cargo near deploy $EVENTS_FT_CONTRACT_ID with-init-call new_default_meta json-args '{"owner_id": "'$EVENTS_FT_CONTRACT_ID'", "total_supply": "1000000000000000000000000000"}' prepaid-gas '100.0 Tgas' attached-deposit '0 NEAR' network-config testnet sign-with-keychain send
CLI에서 출력을 확인하여 모든 것이 제대로 진행되었는지 확인할 수 있습니다.
...
Transaction sent ...
--- Logs ---------------------------
Logs [events.aha_3.testnet]:
  EVENT_JSON:{"standard":"nep141","version":"1.0.0","event":"ft_mint","data":[{"owner_id":"events.goteam.testnet","amount":"1000000000000000000000000000","memo":"Initial token supply is minted"}]}
--- Result -------------------------
Empty result
------------------------------------

Contract code has been successfully deployed.
The "new_default_meta" call to <events.goteam.testnet> on behalf of <events.goteam.testnet> succeeded.
...
이벤트가 제대로 기록된 것을 확인할 수 있습니다!
공급량 정보 쿼리
이제 view 함수가 제대로 작동하는지 테스트할 수 있습니다. 먼저 총 공급량을 쿼리해 봅니다.
near contract call-function as-read-only $EVENTS_FT_CONTRACT_ID ft_total_supply json-args {} network-config testnet now
그러면 다음과 유사한 출력이 반환됩니다.
'1000000000000000000000000000'
만세! 이제 소유자 계정의 잔고가 제대로 작동하는지 확인할 수 있습니다. 다음 함수를 호출하면 총 공급량과 동일한 숫자를 반환해야 합니다.
near contract call-function as-read-only $EVENTS_FT_CONTRACT_ID ft_balance_of json-args '{"account_id": "'$EVENTS_FT_CONTRACT_ID'"}' network-config testnet now
다음을 반환합니다.
'1000000000000000000000000000'
다른 계정의 잔고를 쿼리하면 0을 반환해야 합니다.
near contract call-function as-read-only $EVENTS_FT_CONTRACT_ID ft_balance_of json-args '{"account_id": "benjiman.testnet"}' network-config testnet now
지갑에서 FT 보기
Now that your contract implements the necessary functions that the wallet uses to pickup your contract and display the FTs, you should be able to see your tokens on display in the balances tab.
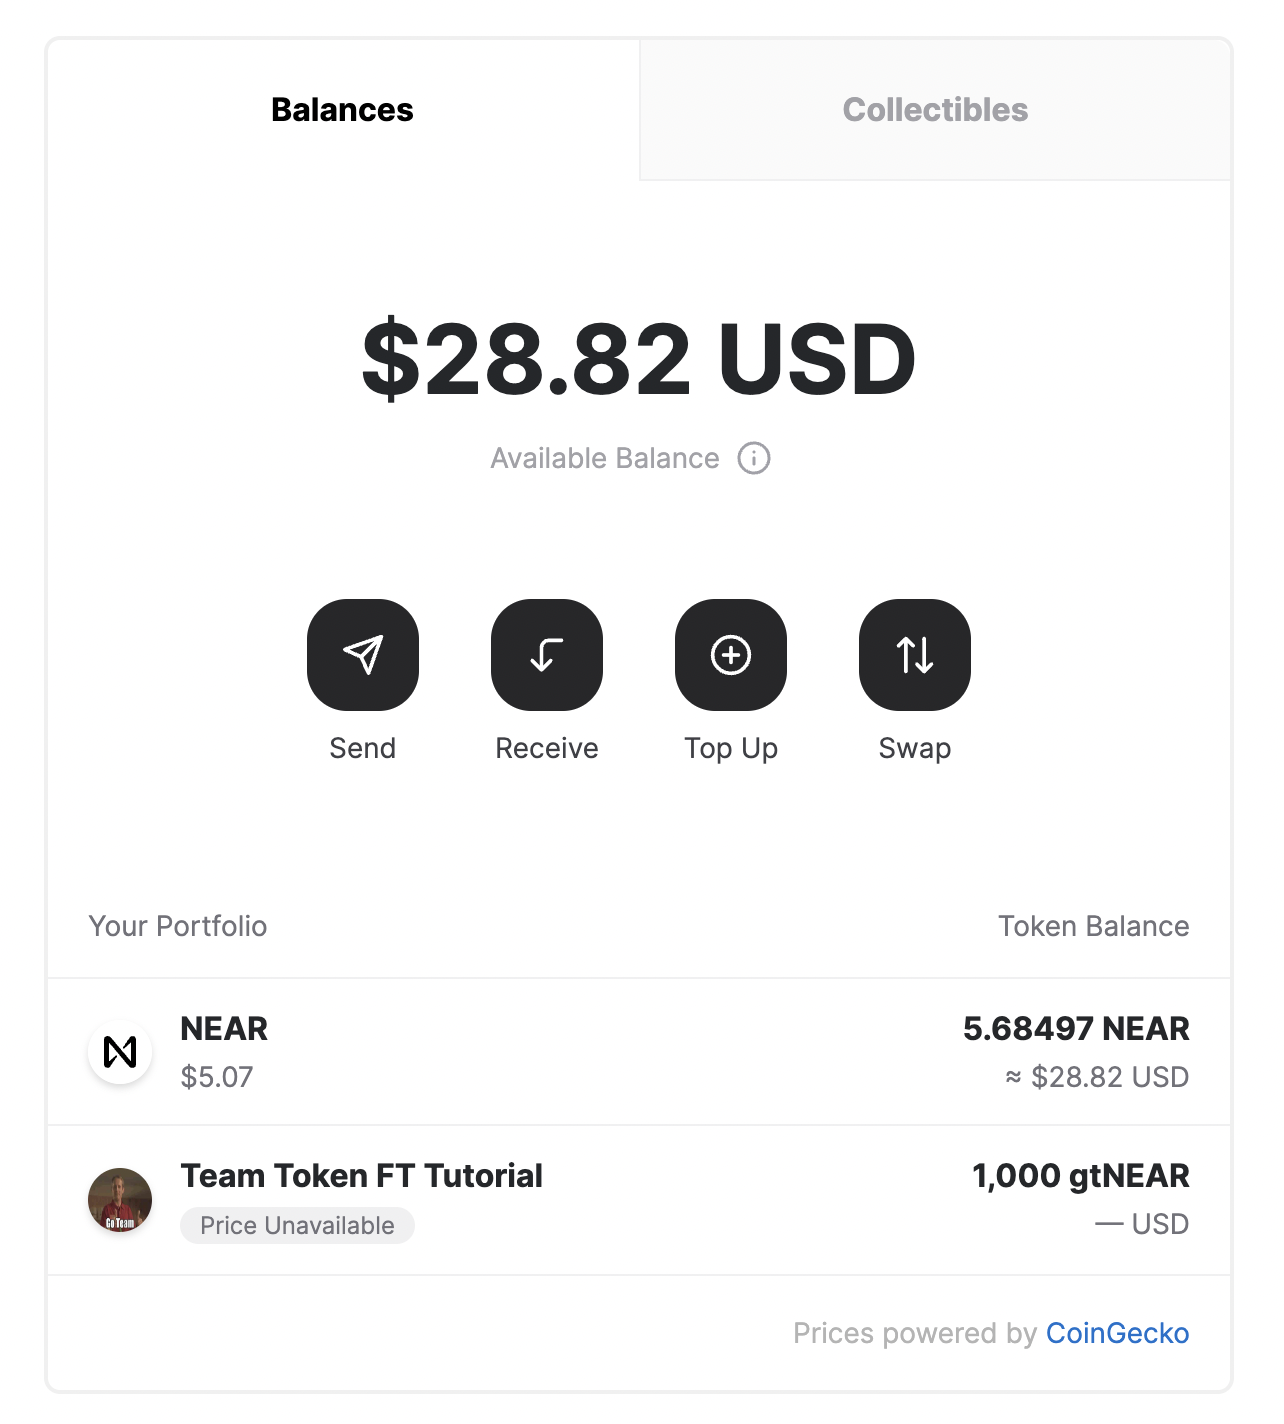
🎉🎉🎉 이는 굉장합니다! 화이팅! 🎉🎉🎉이제 지갑에서 첫 번째 대체 가능한 토큰을 볼 수 있습니다.
결론
오늘 당신은 전체 공급량을 발행하기 위한 로직을 살펴보고 만들었습니다. 그런 다음 일부 핵심 표준 로직과 이벤트 표준을 구현했습니다. 또한, 초기화 시 FT를 발행하기 위한 이벤트를 생성했습니다. 그런 다음 변경 사항을 배포 및 테스트하고 지갑에서 첫 번째 FT를 확인했습니다!
다음 튜토리얼��에서는 FT를 전송하고 받을 수 있도록 계정을 등록하는 기본 사항을 살펴보겠습니다.
At the time of this writing, this example works with the following versions:
- rustc:
1.77.1 - near-sdk-rs:
5.1.0(with enabledlegacyfeature) - cargo-near:
0.6.1 - near-cli-rs:
0.11.0