Bidding with FTs
To further develop this contract we will introduce another primitive: fungible tokens. Instead of placing bids in $NEAR tokens, they will be placed in FTs. This may be useful if, for example, an auctioneer wants to keep the bid amounts constant in terms of dollars as an auction is carried out, so bids can be placed in stablecoins such as $USDC. Another use case is if a project like Ref Finance was holding its own auction and wanted the auction to happen in its project's token $REF.
Specifying the FT contract
We want to only accept bids in one type of fungible token; accepting many different FTs would make the value of each bid difficult to compare. We're also going to adjust the contract so that the auctioneer can specify a starting bid amount for the auction.
- 🌐 JavaScript
- 🦀 Rust
Loading...
Loading...
Accepting bids in FTs
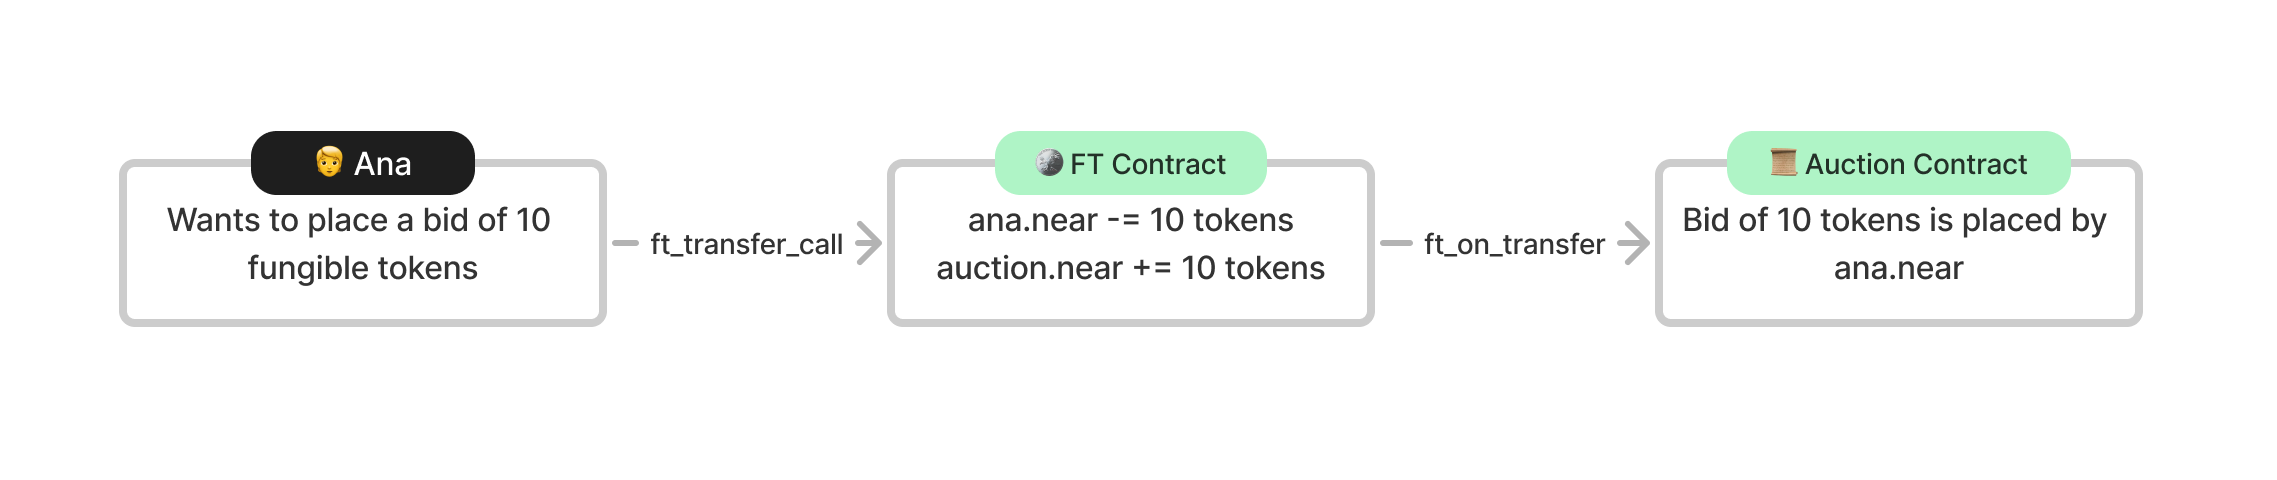
When we were making bids in $NEAR tokens we would call the auction contract directly and attach $NEAR tokens to the call. With fungible tokens, since an account's balance lives on a separate contract, we call the FT contract which then calls the auction contract and transfers tokens. The method on the FT contract to do this is named ft_transfer_call and it will always call a method in the target contract named ft_on_transfer. Take a look here for more information.
The ft_on_transfer method always has the same interface; the FT contract will pass it the sender, the amount of FTs being sent and a msg which can be empty (which it will be here) or it can contain some information needed by the method (if you want to send multiple arguments in msg it is best practice to deliver this in JSON then parse it in the contract). The method returns the number of tokens to refund the user, in our case we will use all the tokens attached to the call for the bid unless the contract panics in which case the user will automatically be refunded their FTs in full.
- 🌐 JavaScript
- 🦀 Rust
Loading...
Loading...
We need to confirm that the user is attaching fungible tokens when calling the method and that they are using the right FT, this is done by checking the predecessor's account ID. Since it's the FT contract that directly calls the auction contract, the predecessor is now the account ID of the FT contract.
- 🌐 JavaScript
- 🦀 Rust
Loading...
Loading...
The bidder's account ID is now given by the argument sender_id and the bid amount is passed as an argument named amount.
- 🌐 JavaScript
- 🦀 Rust
Loading...
Loading...
When we want to return the funds to the previous bidder we now make a cross-contract call to the FT contract.
- 🌐 JavaScript
- 🦀 Rust
- call
- callback
Loading...
Loading...
In JavaScript, we have to return the Promise to transfer the FTs but we also need to return how much to refund the user. So after transferring the FTs, we make a callback to our own contract to resume the contract flow. Note that the callback is private so it can only be called by the contract. We return 0 because the method uses all the FTs in the call.
- lib.rs
- ext.rs
Loading...
Loading...
We then return 0 because the method uses all the FTs in the call.
Loading...
If the call was to fail the FT contract will automatically refund the user their FTs.
What happens if the cross-contract call fails?
The first time this method is called the contract will try to send itself FTs. Most fungible token contracts don't allow one to send themselves FTs so the cross-contract call will fail. However, since cross-contract calls are asynchronous and independent and we are not checking the result of the call then the auction contract does not care that the call failed and ft_on_transfer will complete successfully.
In the other cases, the call to the fungible token contract could only fail if the receiver does not exist, the FT contract does not exist, the auction contract doesn't have enough fungible tokens to cover the amount being sent, or the receiver is not registered in the FT contract. Our contract is set up such that these errors cannot occur, the receiver must exist since they placed the previous bid, the FT contract exists since it was used to place the bid, the auction contract has enough FTs to cover the amount since it was sent that amount by the previous bid, and the receiver must be registered in the FT contract since they needed to have held the token in the first place to make a bid.
Claiming the FTs
When the auction is complete we need to send the fungible tokens to the auctioneer when we send the NFT to the highest bidder, we implement a similar call as when we were returning the funds just changing the arguments.
- 🌐 JavaScript
- 🦀 Rust
Loading...
In JavaScript, since we need to return each cross-contract call we chain the NFT and FT transfer.
Loading...
Creating a new FT
Just as with the NFT contract, we will deploy an FT contract in the sandbox tests using a WASM file compiled from this repo.
When the contract is deployed it is initialized with new_default_meta which sets the token's metadata, including things like its name and symbol, to default values while requiring the owner (where the token supply will sent), and the total supply of the token.
- 🌐 JavaScript
- 🦀 Rust
Loading...
Loading...
Registering users in the FT contract
For one to receive fungible tokens, first their account ID must be registered in the FT contract. A user has to register in an FT contract to pay for the storage used to track their amount of tokens. By default, a contract pays for its own storage, but not requiring a user to register and pay for storage would drain the contract of $NEAR tokens. When the contract is live we don't need to register the accounts that we transfer tokens back to since to make a bid in the first place they would have needed to be registered, but we do need to register the auction contract in the FT contract to receive bids and the auctioneer to receive the funds at the end of the auction. It is most convenient to register users from the frontend rather than the contract.
In our tests, since we are creating a new fungible token and new accounts we will actually have to register every account that will interact with FTs.
- 🌐 JavaScript
- 🦀 Rust
Loading...
Loading...
Simple FT transfer to bidders
Then we will transfer the bidders FTs so they can use them to bid. A simple transfer of FTs is done using the method ft_transfer on the FT contract.
- 🌐 JavaScript
- 🦀 Rust
Loading...
- Call ft_transfer
- ft_transfer definition
Loading...
Loading...
FT transfer call
As stated previously, to bid on the auction the bidder now calls ft_transfer_call on the FT contract which subsequently calls the auction contract's ft_on_transfer method with fungible tokens attached.
- 🌐 JavaScript
- 🦀 Rust
Loading...
- Call ft_transfer_call
- ft_transfer_call definition
Loading...
Loading...
Checking users' FT balance
Previously, to check a user's $NEAR balance, we pulled the details from their account. Now we are using FTs we query the balance on the FT contract using ft_balance_of, let's check that the contract's balance increased by the bid amount and the user's balance decreased by the bid amount.
- 🌐 JavaScript
- 🦀 Rust
Loading...
- Call ft_balance_of
- ft_balance_of definition
Loading...
Loading...
Invalid FT transfer call
If we make a lower bid than the previous this will cause the auction contract to panic. One might expect that ft_transfer_call will fail, but it does not. ft_on_transfer will fail and the FT contract will recognize this and reverse the transfer of tokens. So after making an invalid bid, we should check that the call was successful but the parties involved in the transaction (the bidder and the contract) have the same balance of fungible tokens as they did before the call.
Previous to this, Bob made a bid of 60,000 and Alice was returned her bid bringing her balance back up to 150,000. Now when Alice makes an invalid of 50,000 Alice's balance should remain at 150,000 and the contract should remain at a balance of 60,000.
- 🌐 JavaScript
- 🦀 Rust
Loading...
Loading...
Using FTs with the CLI
If you want to interact with the auction contract you're going to need FTs. For this example, we'll use $DAI where the contract address is dai.fakes.testnet. One can easily acquire FTs through the testnet faucet. Select DAI and withdraw to the account you will use to place a bid. If you take a look at the transaction details you can see that the faucet registers your account in the FT contract and then sends you DAI from the faucet account.
When deploying the contract make sure to specify the FT contract dai.fakes.testnet.
The auction contract will need to be registered as well, you could do this by sending it an arbitrary amount of $DAI from the faucet or you can just register it since it doesn't need any FTs. You should also register the auctioneer,
near call dai.fakes.testnet storage_deposit '{"account_id": "<auctionContractId>"}' --useAccount <accountId> --deposit 0.1
Now you can go ahead and place a bid. DAI has 18 decimals meaning that 1 $DAI is made up of 10^24 smallest units. To make a bid of 2 $DAI you can use the command:
near call dai.fakes.testnet ft_transfer_call '{"receiver_id": "<auctionContractId>", "amount": "2000000000000000000", "msg": ""}' --useAccount <bidderId> --depositYocto 1
Auction architecture
When creating an application there are numerous ways to structure it. Here, we have one contract per auction meaning we have to deploy a new contract each time we want to host an auction. To make this easier we will leverage a factory contract to deploy auction contracts for an auctioneer. Deploying code for each auction gets expensive, with 100kb of storage costing 1 $NEAR, since each auction stores all the same type of information and implements the same methods one could instead decide to have multiple auctions per contract.
In such case, the Contract struct would be a map of auctions. We would implement a method to create a new auction by adding an entry to the map with the specific details of that individual auction.
- 🌐 JavaScript
- 🦀 Rust
class Contract {
    auctions: UnorderedMap<string, Auction>
pub struct Contract {
    auctions: IterableMap<String, Auction>
However, this architecture could be deemed less secure since if a bad actor were to gain access to the contract they would have access to every auction instead of just one.
Conclusion
In this section, you learned a lot about fungible tokens: how to send and receive FTs in a smart contract, and then in sandbox tests how to deploy and initialize an FT contract, how to register a user in an FT contract, and send them some tokens, how to attach FTs to a smart contract call and finally how to view the FT balance of a user. With that, we now have our completed auction smart contract!
Taking a further step back we've taken a very simple auction contract and transformed it into a more production contract with thorough testing. To improve the auction we learned how to add a prize by introducing NFTs, and enabled auctioneers to host auctions with FTs.
In the next part of the tutorial, we're going to update the frontend to interact with the new features of the contract.